Beehives have been used by beekeepers since ancient times. In them, the bee nest is placed horizontally, and the frames are lined up in a row one after another. This article provides a description of the hive-lounger, its advantages and disadvantages, as well as step-by-step instructions on how to independently make such a design at home and the features of keeping bees in it.
Characteristic of a hive-lounger
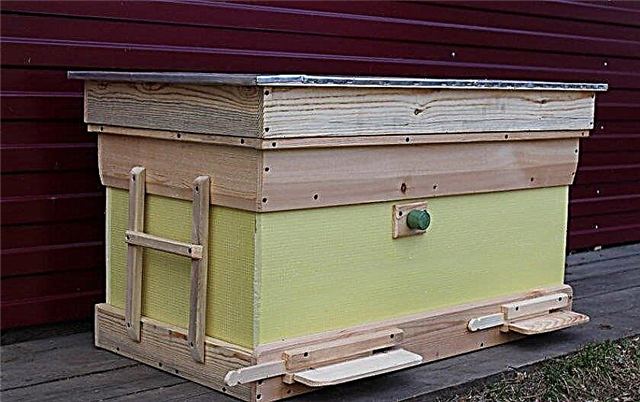
This type of hive is a long monolithic box, covered with a hinged lid on top. The interior of the structure consists of one or two compartments.
Did you know? For the production of 1 tablespoon of honey, the coordinated work of 200 bees is required throughout the day.
The main design features are listed below:
- The hive-lounger consists of one body, inside which you can install additional partitions.
- For the construction, standard Dadan-Blat frames with a size of 300 × 435 mm are used.
- The frame of the hive consists of a bottom, side panels, a front wall with doors and a lifting roof.
- The case is wooden. The wall thickness of the structure is 30-35 mm. The bottom thickness is at least 35 mm.
- The average weight is about 38 kg.
Advantages and disadvantages
Lounger hives differ from multihull hives in their design, but also have advantages and disadvantages.
- The positive qualities of the design include:
- simplicity in work - for access to a bee family it is enough to simply open the top cover. It is not necessary to move heavy and dimensional cases to get to some frames;
- ease of transportation - the design is solid and will not fall apart into individual parts during transportation. It is enough to fix the frames with the help of nails so that they do not move when the hive is moving and do not injure the bees;
- the possibility of placing two bee families at once in the structure - for this it is enough to divide the interior of the hive into two parts using a dense partition. At the same time, bee families will be able to warm each other well in winter, but will not contact each other;
- fast pumping of honey from the structure;
- low cost of the hive - it takes 2 times less material to make it than to a multi-hull structure;
- large internal volume - allows you to grow a strong bee family;
- the hive-lounger retains heat in the spring like a thermos and looks beautiful in the apiary.
Important! Due to its simplicity in working with bees, hive loungers are recommended for beginner beekeepers.
- The cons of the hive-lounger are listed below:
- the inability to install anti-mite nets;
- the large weight and large dimensions of the structure require a lot of free space and make moving the hive time-consuming;
- inability to increase the number of frames.
How to make a beehive sunbed on 24 frames with your own hands
To make a beehive, you need to have the right amount of material and a standard set of tools for working wood. The manufacturing technology of the structure is not complicated, but requires strict adherence to the size and skills of working with tools. The following article describes a detailed algorithm for assembling a hive-lounger.
Sizing
Before proceeding with the manufacture of the hive, you need to consider its dimensions and prepare a drawing. This will help to correctly cut the necessary details and tightly connect them together so that the frames fit inside the hive.
The standard dimensions of a hive-lounger for 24 frames with a width and height of 300 × 435 mm are:
- bottom length - 870 mm;
- bottom width - 565 mm;
- side wall height - 635 mm;
- roof length - 935 mm;
- roof width - 810 mm;
- the size of the lower slots - 12 × 140;
- the diameter of the upper round notches is 25 mm.

According to the listed sizes, they procure all the necessary small parts, from which the body is assembled. To prepare boards and slats of the required length, you can print the finished drawing of the hive and work on it.
What do you need?
Beehive lounger can be made from wooden boards or plywood. The wooden structure is more durable and beautiful, but this material will cost more.
The list of necessary materials and tools is presented below:
- wooden boards 30 mm and 35 mm thick;
- wooden slats - for fastening the frame;
- dense grid;
- sheets of slate or tin;
- roulette;
- saw, planer and other tools for cutting and preparing wooden parts;
- square;
- hammer;
- electric drill;
- screws and nails;
- chisel;
- glue;
- paint;
- drying oil;
- accessories (hinges, handles);
- pencil.
Important! It is recommended to use tree species such as pine, aspen or linden. Boards should be well-dried and even, with a minimum number of knots.
Step-by-step manufacturing instructions
To make a beehive on your own, you need to have a little experience with wood. In the manufacture of all parts are guided by the drawing and the above dimensions.

A step-by-step instruction for the manufacture of a beehive lounger with 24 frames is presented below:
- Using a drawing, tape measure, corner and pencil, measure and cut out all the necessary details from a tree. Places of cuts must be smooth and neat.
- To assemble the bottom, put together a rectangular frame from wooden slats and tightly fill it with chopped pieces of boards of appropriate sizes, connecting the parts with a tongue and nail.
- Make the side walls of the structure by connecting them into the tongue and nail. Attach them to the bottom, leaving a protrusion behind the bars 2 cm.
- On the front and rear walls of the structure, prepare grooves of 18 × 11 mm in size from above. Frames will be inserted into these grooves.
- Cut through the notches at the bottom of the boards. Knock down the walls with the rest of the structure.
- Attach the flight board and gate valves to the flyways.
- To make the roof, assemble the boards with nails in a spike. Attach the resulting part to the frame using hinges so that the roof opens. Put roofing material on top.
- Drill a slot measuring 200 × 3 mm from the rear of the roof, close it from the inside with a dense mesh. This hole is necessary for ventilation of the internal space of the structure.
- Drill a round hole with a diameter of 25 mm on the front. Close it inside with a dense net.
- Attach small wooden blocks to the outer surface for the structure - they will be the legs of the hive.
- Treat the resulting structure with drying oil, and then paint. This will increase the durability of the hive and give it a beautiful appearance.
- Attach the handles to the side walls of the structure and insert into the frame body.
Video: Assembling a ready-made 24-frame hive lounger
Bee hive technology
When kept in a hive-lounger, the bee family becomes stronger, and its productivity increases by almost 2 times compared with the content in multi-hut houses.
Important! In summer, it is recommended to place only one bee family in the hive-lounger, so that it fully occupies the entire space. You can plant a second family in spring, autumn or winter.
The technology for keeping bees in such structures is described in detail below:
- opposite the letok there is a brood with bees-nurse, it is placed on one side of the hive;
- in the process of uterine egg production, the number of brood increases and it occupies an additional framework;
- the rest of the sections is a side store and is designed to collect honey, as well as accommodate flying bees;
- to increase the amount of honey during the period of honey collection, it is necessary to limit the egg laying of the uterus. For this, it is placed in the center of the nest together with several brood sections of different ages, and honey sections are placed on both sides so that the uterus does not have room for laying eggs;
- after the end of the bribe, the uterus is returned to its original place so that it intensively lays eggs and strengthens the family by winter;
- when the bee family occupies about 10 sections (before the transition to the swarm state), the place near the taphole is freed and a frame with the uterus and laid eggs is placed there, gradually adding another 7-8 sections to it. This part is separated from the rest of the hive using a special dividing grid, through which cells all bees can pass, except for the uterus;
- when using a dividing grid to enclose the uterus, on the other side of the uterus, they first put frames with sowing, then place sections with offspring of different ages (from the youngest larvae to older ones), and then the frames with a sealed brood. Next, place sections with honey, artificial wax and sushi;
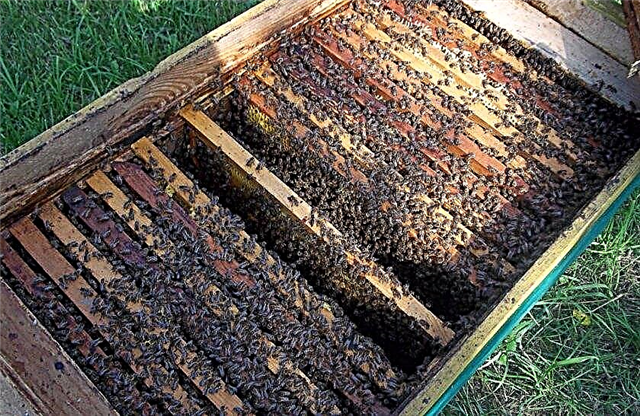
- so that the uterus continuously lays eggs, and the bees near the letok build new honeycombs, each week it is necessary to move the brood sections to the lattice. Instead, they insert a framework with artificial wax, so that the process of egg laying of the uterus continues;
- in the general department, the brood is fed and sealed, and young bees flying out of the extreme sections release the honeycombs to fill them with honey. Each bee that flies out through the summer passage passes through the compartment with the uterus, maintaining contact with it;
- when rearrangement of sections with future offspring from the department with the uterus to the common part of the hive, they are placed near the dividing grid, shifting the remaining frames to the opposite side of the structure. With a lack of free space, honey can be removed. This allows you to create a continuous conveyor in the hive-lounger to build new honeycombs, place eggs in them and fill the vacated cells with honey.
Did you know? The approximate weight of one average bee family is 8 kg!
Despite its large size, the hive-lounger allows you to get a larger yield of honey compared to multihull hives and greatly simplifies the work of the beekeeper with the bee family. Using the recommendations listed in this article, you can easily build such a structure yourself.


